Take a close look at the two pairs of socks in the photo below. One of them was knit with a luxury yarn. The other was knit with a budget yarn. Can you tell the difference?
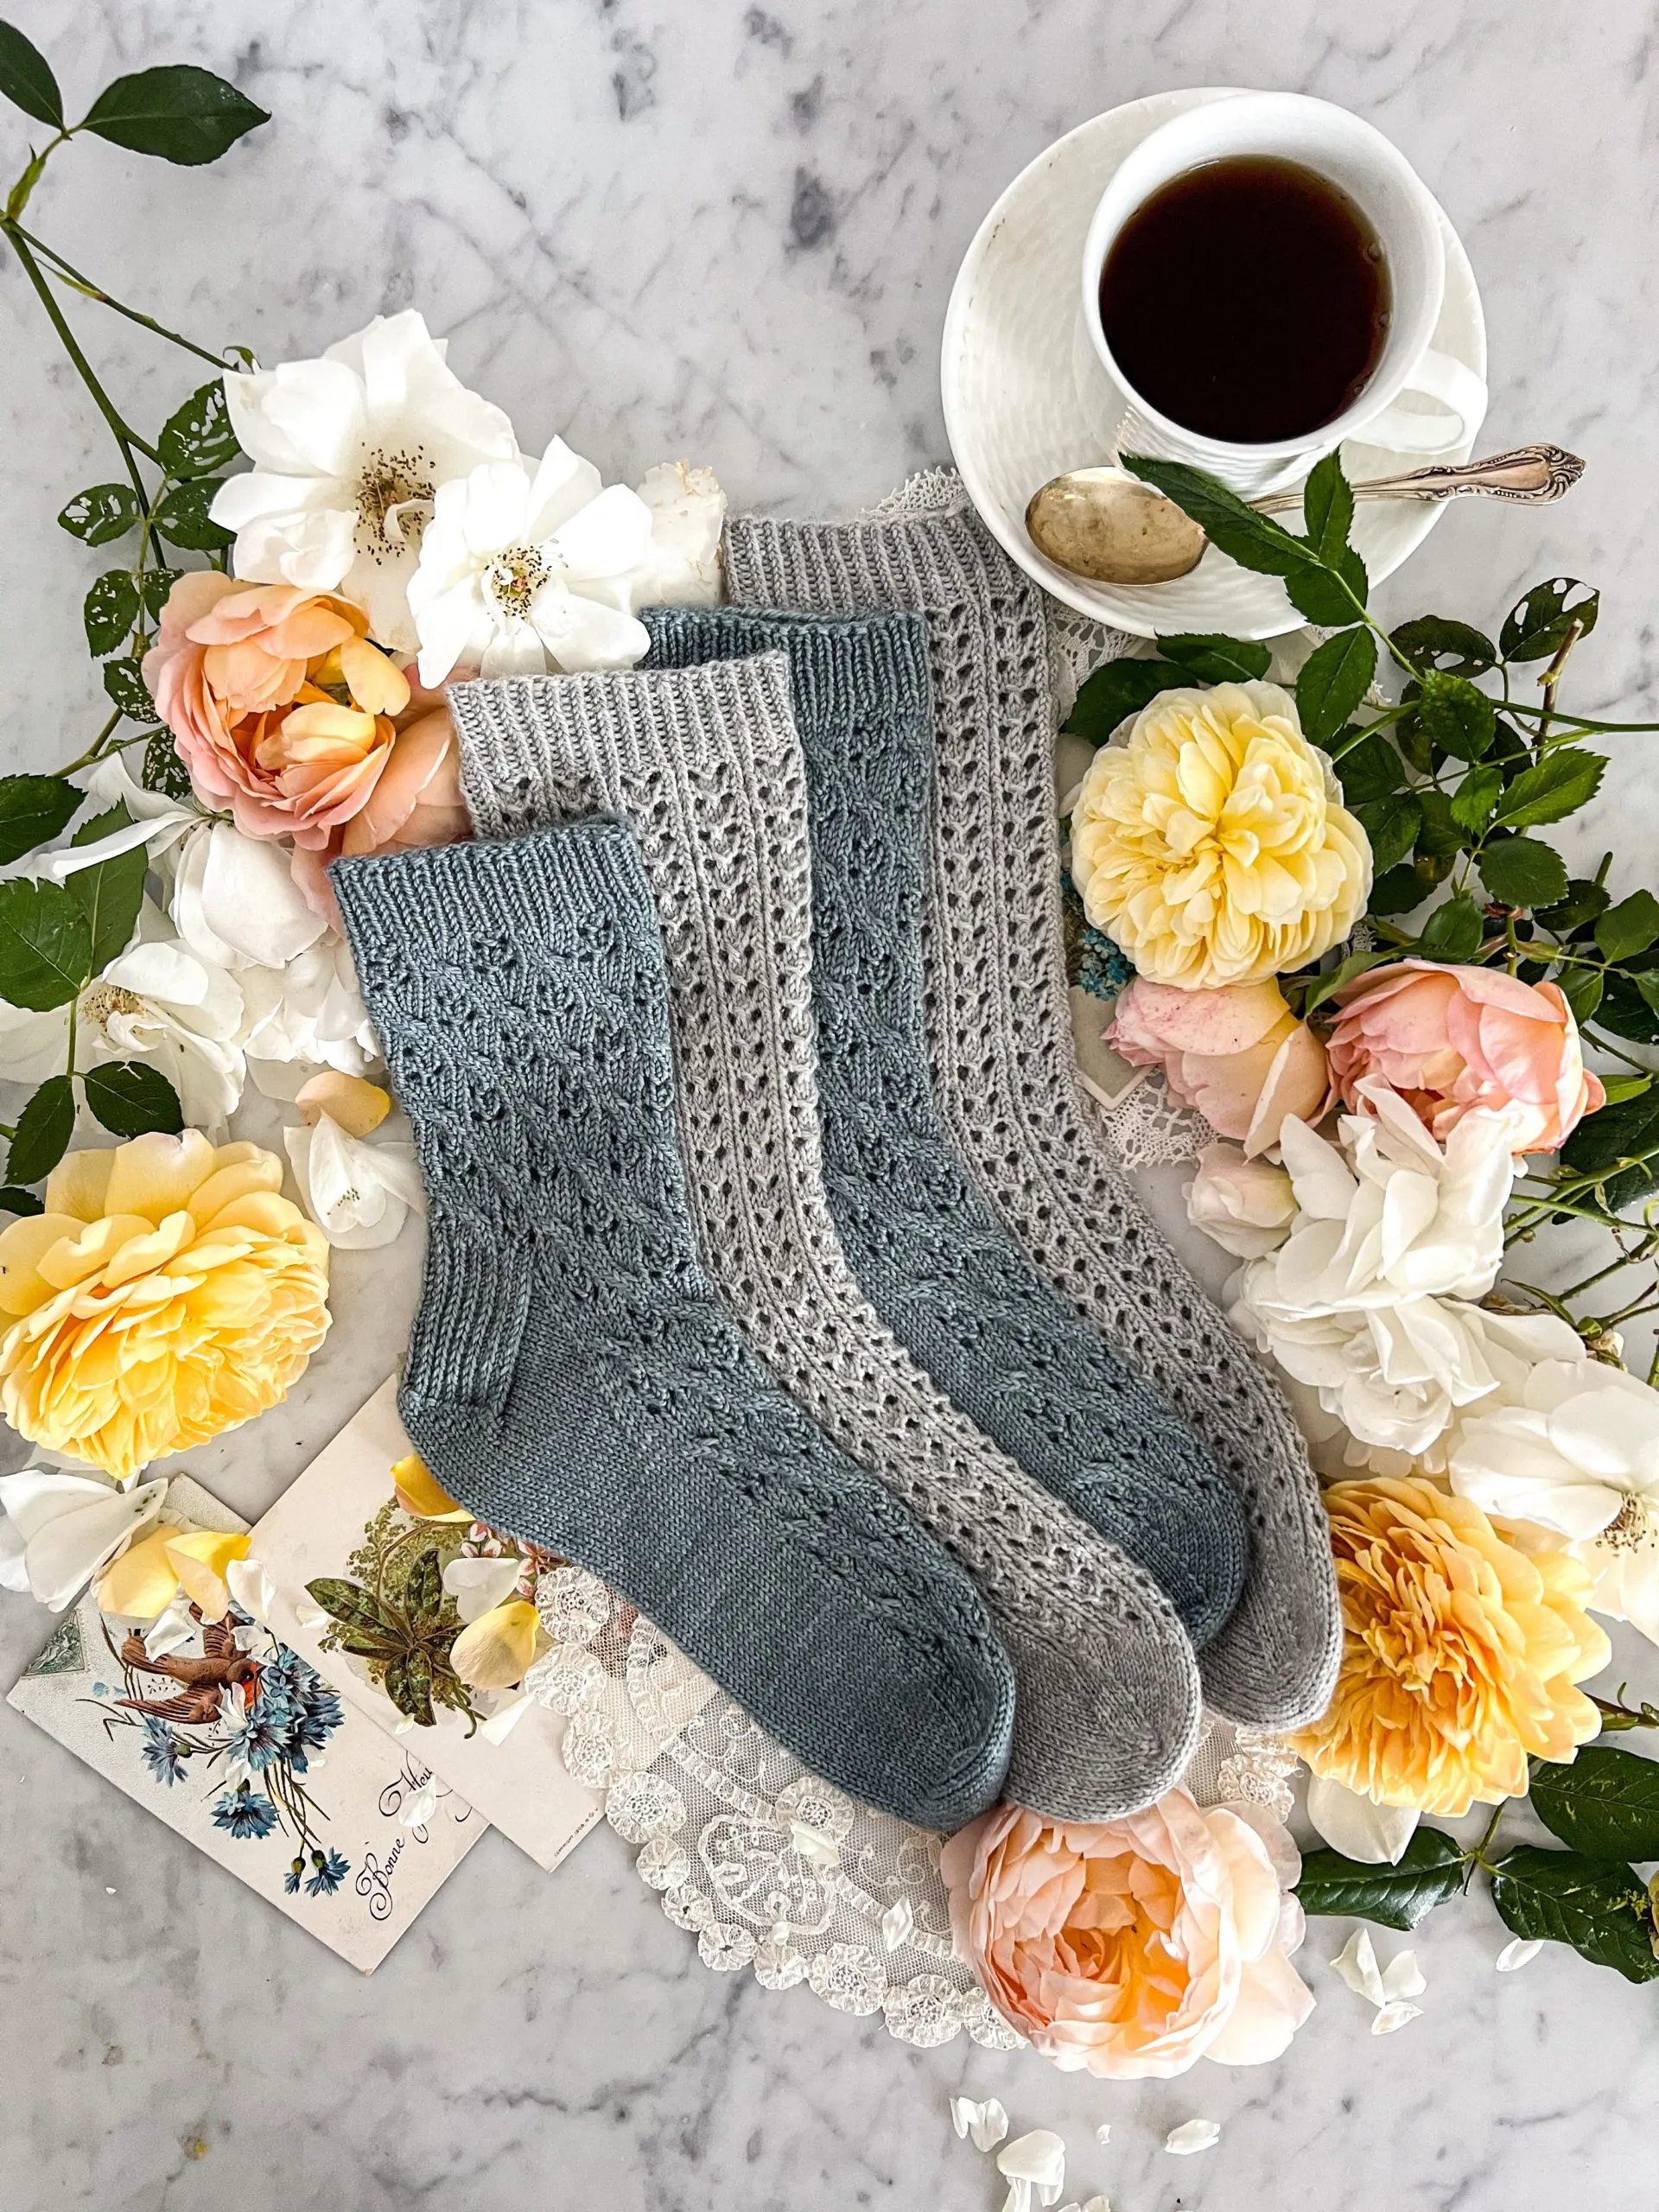
The blue socks, my Gladdening Socks, were knit with Magpie Fibers Swanky Sock. It’s a truly luscious yarn with a mix of silk and merino fiber. The lighter socks, my Solimar Socks, were knit with Knit Picks Stroll. Stroll is a well known and much-loved budget yarn that costs about a third of what the Swanky Sock cost me.
I love both of these pairs of socks and think they’re equally beautiful.
I also think they photograph equally well. There are ways to help ensure that your projects knit with budget yarns really shine. Below, I’ve got five tips to help you achieve glamorous-looking knits on a budget.
But before we get to that, let’s tackle a couple important issues in the knitting world that relate to yarn choices.
There Are Valid Reasons to Use Luxury Yarn and Budget Yarn
So many factors go into choosing the right yarn for your project, and there are all sorts of reasons why you might choose one yarn over another.
Your budget, your values, and your needs all influence that decision—and those are all valid factors to consider. Whether you choose a hand-dyed yarn from a dyer whose stance on social justice you admire, a locally sourced yarn from your neighbor who’s a shepherd, a synthetic yarn that will be easily washed for a project that gets lots of use, or a budget yarn for a project that will require some serious yardage, you’ve made the right choice for yourself. You know your own needs.
In other words: this post is NOT the place for yarn snobbery (nor, frankly, is this blog generally, so if that’s your thing you might want to look elsewhere). We’re all doing our best to make good choices, and those choices will look different based on our circumstances. What we’re not gonna do is assume we know what’s happening behind the scenes in others’ lives and be unkind to them because of it.
Likewise, this post isn’t the place to complain about how much indie-dyed yarn costs. I’ve made friends with a lot of dyers over the last few years, and I see how much love, hard work, creativity, passion, and risk goes into their businesses. Spoiler alert: it’s a lot. Just because something is out of our budgets doesn’t mean it’s not worth the price it costs.
Social Media Can Be Misleading
Now let’s talk about the other elephant in the room (this is a very big room, you see, with more than one elephant). There can sometimes be pressure in certain parts of the online knitting world to only use fancy yarns. It can feel like everybody is knitting the latest trendy sweater in yarn spun from unicorn tail hairs and dyed in 24k-gold pots.
But that’s not accurate, and it doesn’t have to be that way.
One of the many joys of working with test knitters is seeing the varieties of yarns they choose to use. Some like variegated yarns, some use really woolly wools, some prefer something easily accessible at their nearest craft store, and some like to go stash diving for projects. There’s a huge range of price points, fiber contents, and color palettes among the testers who’ve worked on my patterns.
And you know what? They’ve all turned out great.
I encourage you to check them out by searching Instagram for #ABITBknits or any of the unique hashtags created to go with each of my patterns.
And then think about who you’re following, too. Is your feed full of perfectly curated images knit by people who only use certain exclusive yarns? Maybe it’s time to expand the range of people who are influencing your perception of what a good knit project looks like.

Five Tricks for Making Budget Yarn Shine
Budget yarns can look beautiful in your finished projects. It’s all a matter of making sure you take a few simple steps. Here are five tips for showing off your projects knit with less expensive yarns.
1. Focus on your stitch tension.
We all remember our first few knit projects with chaotic tension, right? No amount of silk or cashmere could make those projects look as polished as our later work. That’s because technique matters more than yarn choice. If you want to help your project look its best, think about your stitch tension and what you can do to keep it smooth and even.
That means, if you’re new to knitting, the best thing you can do is practice, practice, practice. Build that muscle memory. Focus on what tightens your tension and what loosens it. Try new ways to hold your yarn. Keep experimenting until you find the right combination for you.
If you’ve been knitting for a while but struggle with tension, think about what contributes to that. Is it your needles? Do you struggle more with certain yarns than with others? Does your mood, stress level, or environment affect it? Use that self-knowledge to your advantage.
2. Choose a budget yarn with some natural fiber in it.
Whenever possible, I strongly recommend using a yarn that has at least 50% natural fiber. My favorite is wool, but you might also want to use alpaca, cotton, linen, or other animal or plant fibers.
I like wool because wool has memory, which helps keep knits from getting saggy and misshapen as they’re used. That memory will help your knits look polished longer.
Bonus: natural fibers photographs differently from synthetics. Synthetics tend to have a sheen that can be unsettling, like a wax figure from Madame Tussaud’s instead of a real person. When you include a natural fiber in the yarn, it’ll help offset some of that unnatural sheen.
3. Soak your projects when you’ve finished.
This is the other reason I recommend using yarn with some natural fiber in it: when you’re done with a project, you should soak it, gently squeeze out the water, and lay it flat to dry. You don’t need sock blockers or mannequin pieces or wires or pins or mats. I lay my stuff out to dry on my patio when the weather is nice. If it’s not so nice out, the projects dry on the floor.
The reason this step is so important is that it relaxes the natural fibers in your yarn. That helps the stitches to settle into place and smooth out. This is an especially important step if you struggle with mild to moderate rowing out.
The end result of this process? Your knits look more polished, even, and professional. There’s no such thing as a knitter with perfect tension, so this step will help every project look just a little better.
But entirely synthetic yarns don’t relax when they come into contact with water. You need natural fiber for this to work. The more natural fiber, the better.

4. Photograph your knits with good lighting.
I’ve talked about photographing with natural light a lot on here, so I won’t go into too much detail now. Suffice it to say you should make sure to use indirect, natural light with a neutral temperature. You don’t want light that’s reflecting off of a colored surface or coming in at a harsh angle that casts shadows. For more on this, see the series of blog posts that starts with this one here.
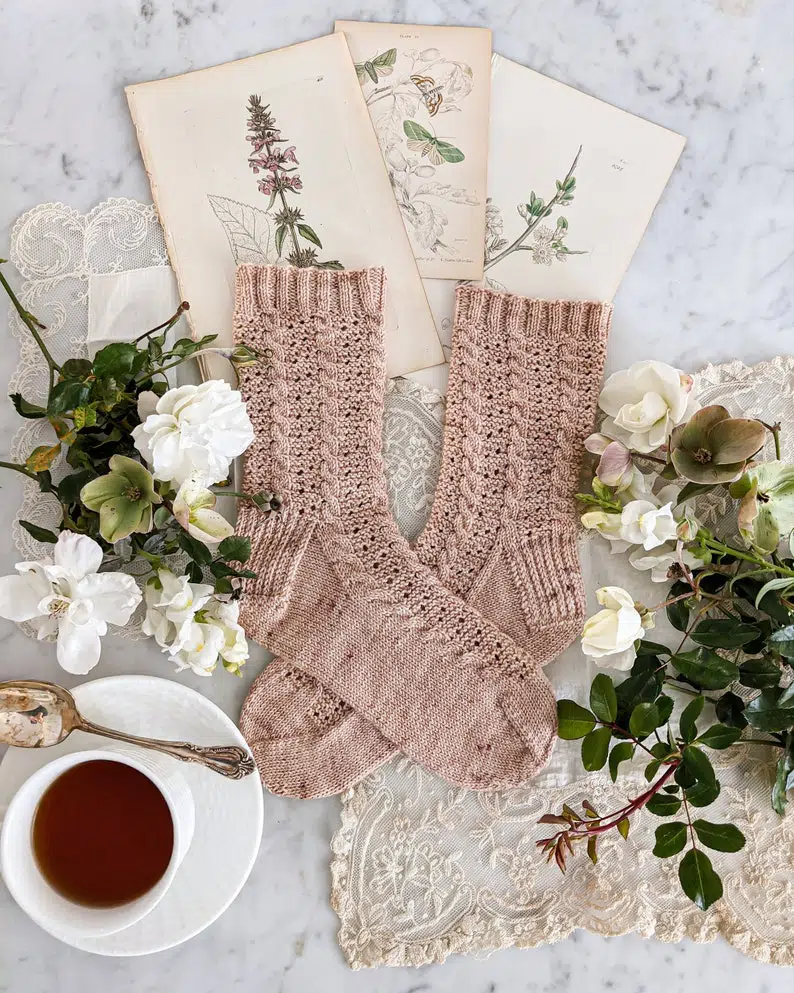
5. Use props that will add to the ambiance you want to create.
I’ve leaned hard into my everyday romanticism. I like to use things that are both beautiful and functional. Part of that means I’ve got a nice little stash of dishes, trinkets, and flowers around to use in my photos. When I photograph my projects, I add those pretty things as props to create the atmosphere I want.
When you add things that are special to you (and when those things match the mood you’re trying to evoke in your pictures), the budget yarn will seem elevated by association.
You see, it turns out your budget for yarn doesn’t have much relation to how nice your knits can look or how beautiful your pictures of your knits can be. Attention to technique matters more, and that’s something you can do for free. With a little preparation and thought, you’ll be able to make any project look fancy, whether it cost you $10 to make or $100.
Let’s stay connected!
Join my newsletter for 30% off all new releases, regular updates with helpful tips and tricks, first crack at registration for upcoming workshops, exclusive discounts, and more.
Join the A Bee In The Bonnet Facebook Group to participate in knitalongs and other fun community events
Come hang out with me on the A Bee In The Bonnet TikTok
Follow along on the A Bee In The Bonnet Instagram
Get inspired via the A Bee In The Bonnet Pinterest


this is a great post! Thanks
@Sonna, excellent design thank you ,☺️
A refreshing knit read. Thank you xx
Thanks! I’m glad you enjoyed it.