You all know by now that I take yarn substitution very seriously. That’s because knowing how to substitute yarn opens up a whole new world for knitters. After giving it some thought, I decided the best way to help illustrate this point is to release a free hat knitting pattern for you to experiment with. This relatively simple hat has been tech edited by my excellent tech editor, Bonnie Davis.
So I pulled out my mohair and suri alpaca, held them double with some fingering-weight wool, and went to town. You can see pictures of the results here. It turned out rather well!
This simple hat pattern works up quickly but is lightweight and warm. In other words, it’s perfect for holiday gift knitting. I know–I’m in denial that we’ve hit that time of year, too.
But there’s no reason you can’t use your holiday knitting to learn something new, too. This free hat pattern is written for fingering-weight wool held double with lace-weight silk mohair, but you can experiment with other options and different yarn weights using your new-found knowledge of yarn substitution.
Here’s why I think this is the perfect way to learn about yarn substitution.
Why A Free Hat Knitting Pattern Is A Great Way To Learn About Yarn Substitution

Knit hats are a great way to study yarn substitution. They’re small and comparatively easy, but changes in gauge can make a big difference. If something goes wrong, you haven’t invested months of work into the project. You can rip it back and restart more easily than you can a sweater. You’re also more likely to make major yarn substitutions for a hat than you are for, say, a pair of socks.
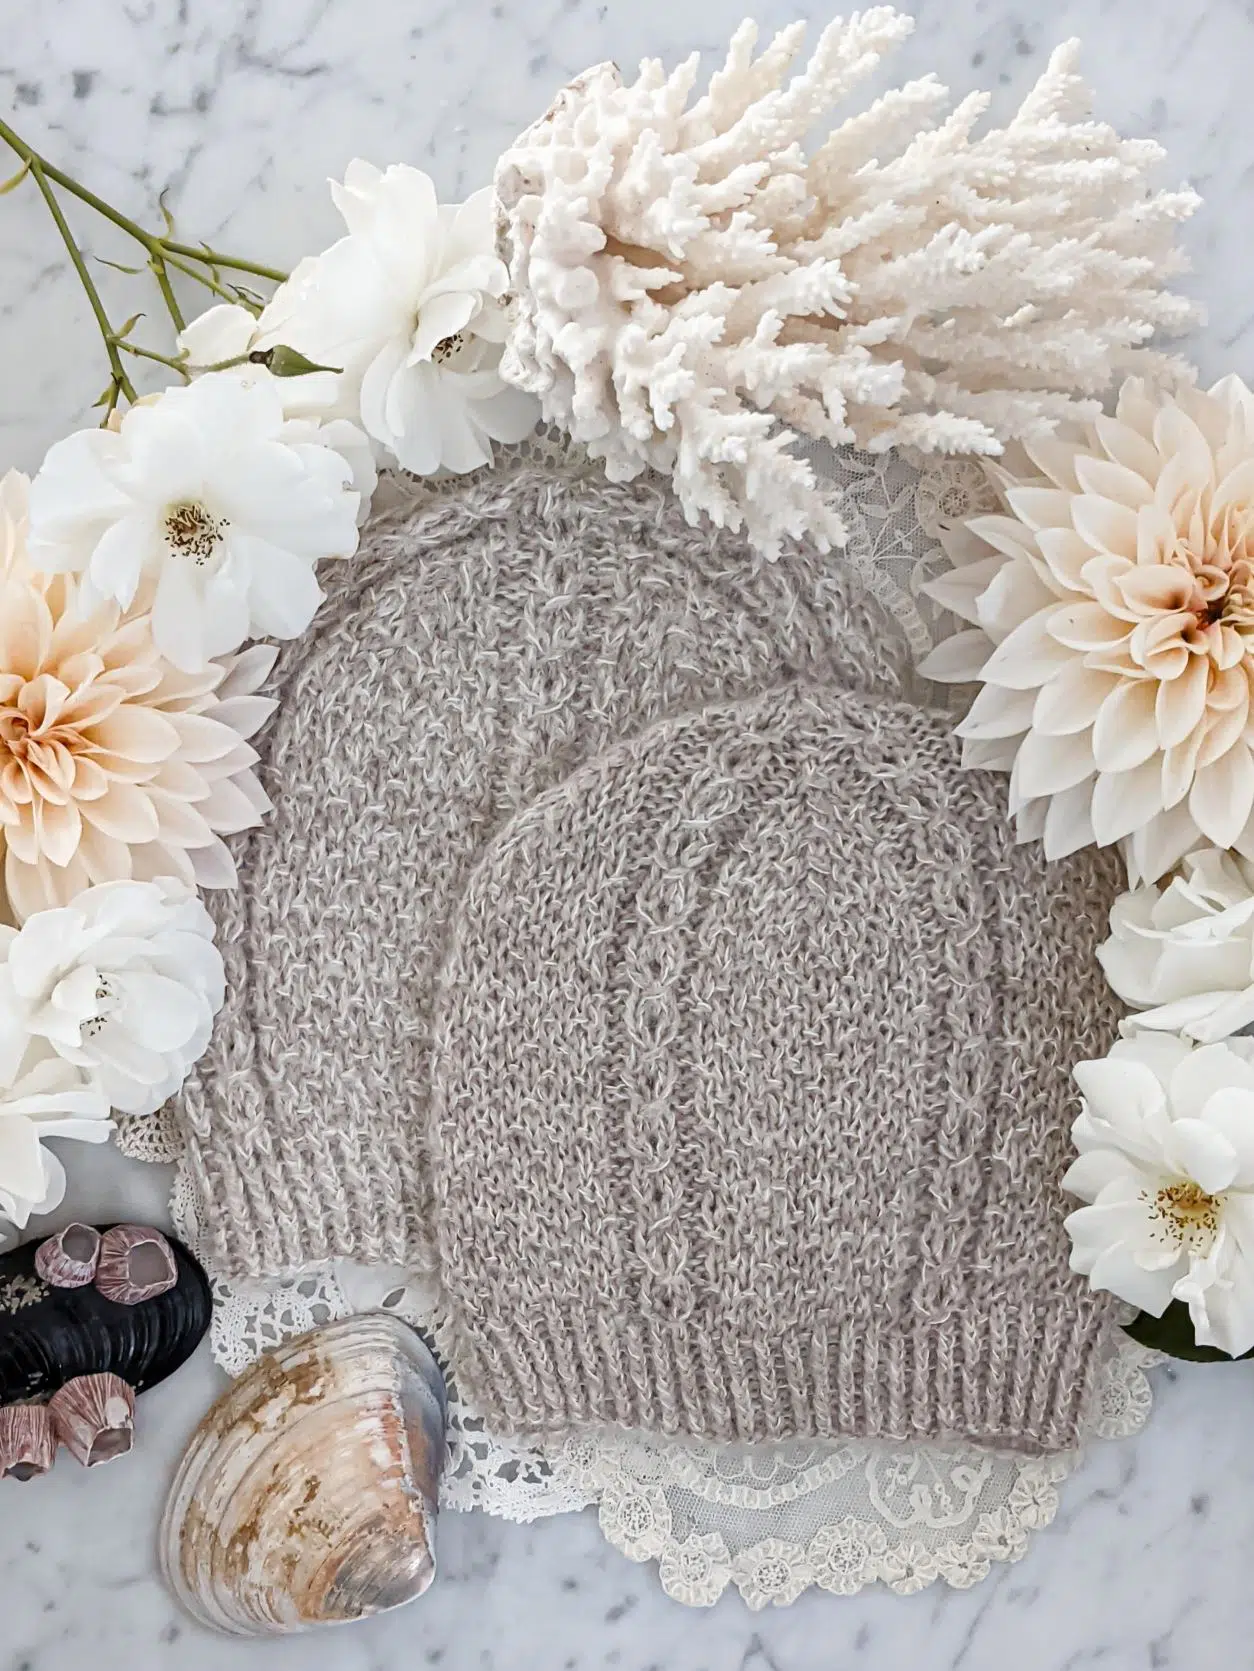
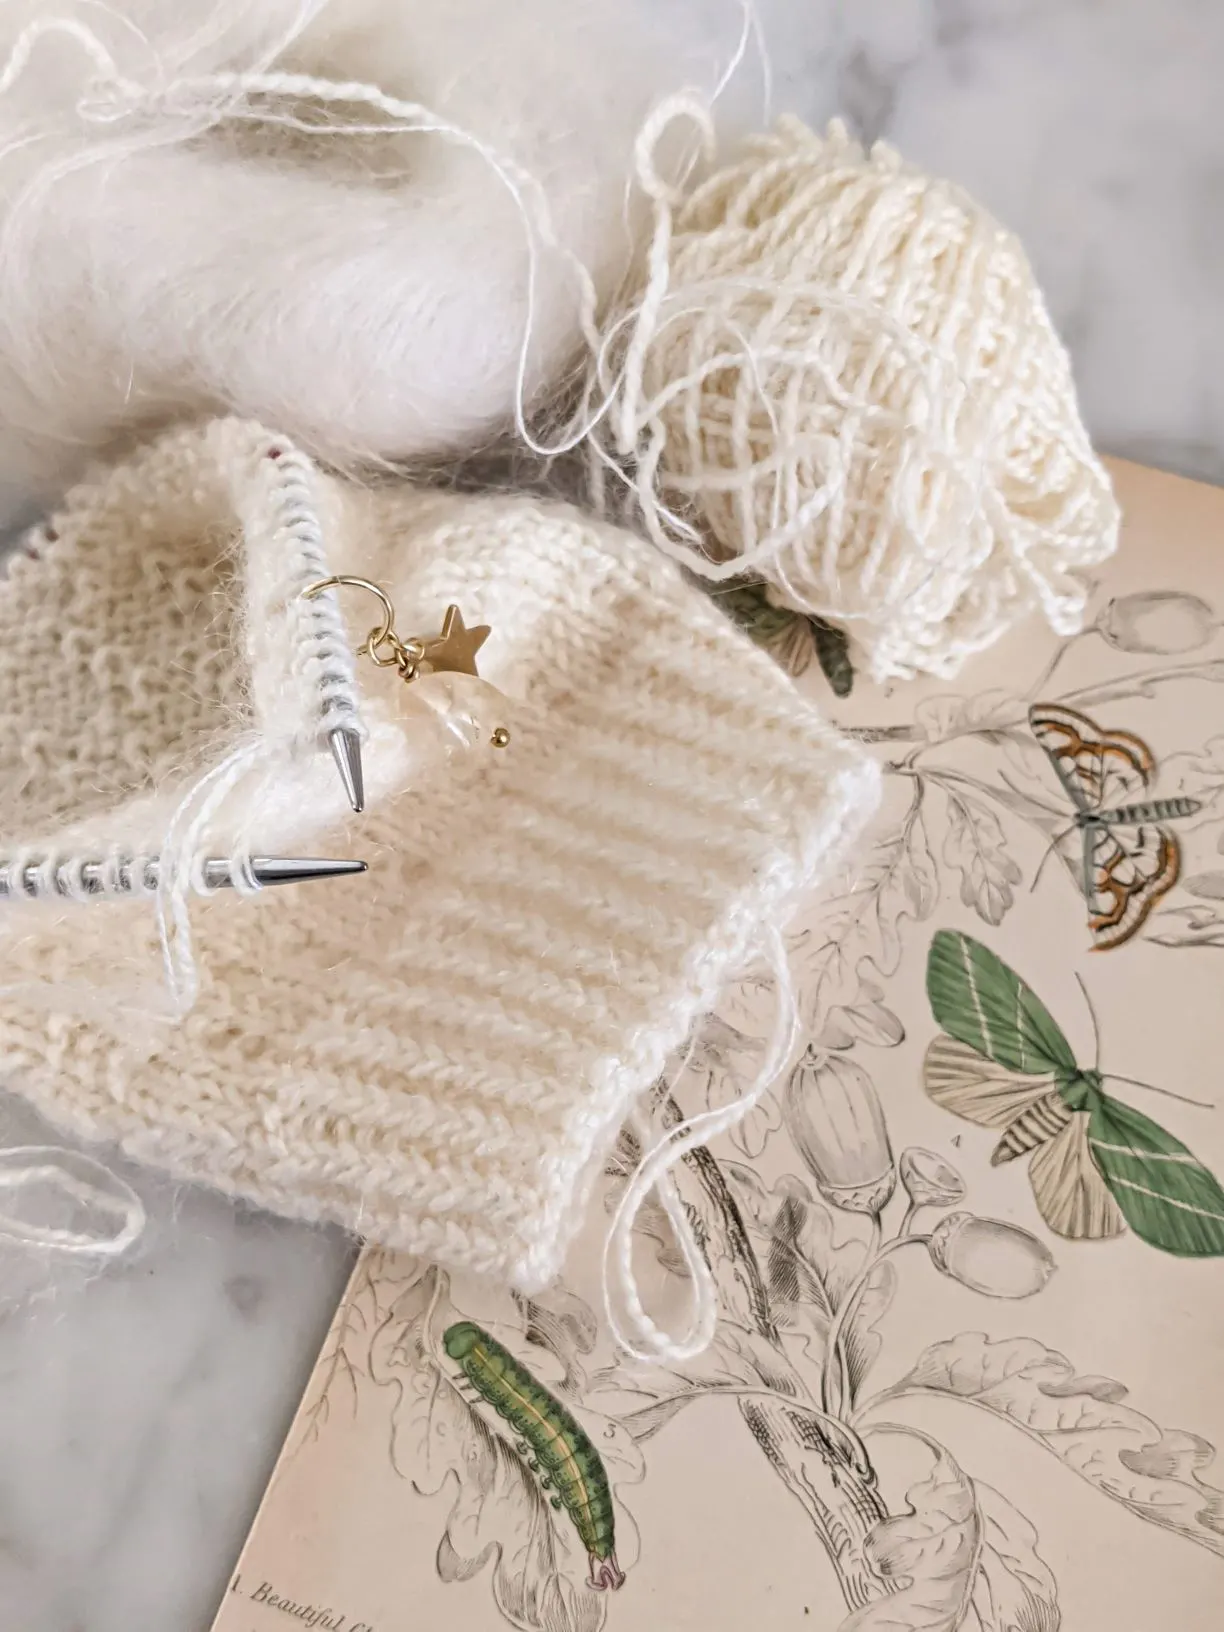
If you look at the pictures in this post, you’ll see two versions of this unisex hat. One is knit with silk mohair (the hat sitting on top of the other), while the other is knit with suri alpaca (the hat underneath). If you look closely, you’ll see that the suri alpaca hat is a little bigger. That’s on purpose. I changed the yarn for the second hat but kept everything else exactly the same, including the needle sizes, so I could isolate the effect of just the yarn itself.
As you can see, the suri alpaca is just slightly thicker than the mohair, which leads to a hat that is overall slightly bigger. The stitch definition is also less clear because the suri has a denser halo.
It turns out learning about yarn substitution is a lot like performing scientific experiments. You isolate one variable, test it out, then tweak one more thing, test it, and so on. With a knitted hat, that process moves a lot faster!
If you want to make additional substitutions with this simple hat, you could try experimenting with a DK or worsted-weight yarn without a lace-weight fluffer held double. You could also test out plant fibers and different yarn constructions (single-ply vs. worsted-spun vs. woolen spun).
Finally, knitted hats make great gifts. That means, when you’re done experimenting with yarn substitutions by knitting up a few versions of this free pattern, you won’t be stuck with several versions of the same hat if you don’t want to be. You can easily give them away to others.
Introduction to the Littoral Hat: A Free Hat Knitting Pattern
littoral (adj.) – of, relating to, or situated or growing on or near a shore, especially of the sea
After spending much of my time in littoral zones this past year (my kid and I did a lot of tidepooling during the worst of the pandemic), I knew I wanted to name a pattern in tribute. The texture of this simple hat reminds me of seashells and sand, while the shape reminds me of sea urchins.
I try my very best to make sure that all of my patterns are error-free and easy to follow. If you have any trouble with this pattern, please let me know! You can reach me by email at abeeinthebonnet@gmail.com, on Ravelry at abeeinthebonnet, on Instagram at @abeeinthebonnet, and on Facebook at https://www.facebook.com/abeeinthebonnet.
And of course, if you share photos of your project on social media, I’d love to see them! Please tag your photos with #LittoralHat and #ABITBKnits to share with others.
Notes and FAQs
This free knitting pattern is a great project for beginner knitters looking to learn more about yarn substitution. Although the pattern is written for adult sizes, a knitter willing to do a little math could easily work up a gauge swatch in finer yarn, adjust the needle size, and make a cute baby hat.
Likewise, a knitter looking to experiment with gauge could use the recommended needle size for the brim but go up a size or two for the body of the hat to try making it a slouchy hat. While I don’t recommend this method of adjusting size for garments or socks, hats get much less friction when they’re worn. That means it’s fine to use larger needles and make a looser fabric (within reason!) to turn fitted beanies into slouchy beanies.
When choosing needles for this project, your best bet is to go with the method that is most comfortable for you. I knit my hats using circular knitting needles and then double pointed needles to close the crown. You could also use magic loop or two circulars or just do DPNs the whole way.
When you’re casting on your hat, try to keep your cast on nice and stretchy. While I like the long tail cast on, some knitters find it’s not stretchy enough for them. If that’s also the case for you, here’s a link to a great tutorial for how to do the tubular cast-on for 2×2 rib. That will give you even more stretch.
I’ve left my sample hats without embellishment, but you should feel free to add fun details if you’d like! A faux fur pom pom is a popular way to jazz up an otherwise simple beanie.
Pattern Specs
| SIZES | S, M, L, XL. Finished hat dimensions: 16.25 (18.25, 20, 21.75) in / 41.5 (46.5, 51, 55) cm circumference (Note: most people like their hats snug, so if that’s what you’re looking for, choose a finished hat size that is somewhat smaller than your actual head circumference.) |
| MATERIALS | Fingering-weight yarn, 140 (165, 190, 215) yds / 128 (151, 174, 197) m; held double with lace-weight silk-mohair yarn, 140 (165, 190, 215) yds / 128 (151, 174, 197) m. Alternatively, you can use worsted weight yarn, 140 (165, 190, 215) yds / 128 (151, 174, 197) m.t Sample shown knit in Cloudborn Highland Fingering, 100% Peruvian Highland Wool, 494 yds (452 m) per 3.5 oz (100g), held double with undyed laceweight silk-mohair yarn, 72% kid mohair, 28% silk, 459 yds (420 m) per 3.5 oz (100g). |
| GAUGE | 4” (10 cm) square = 22 stitches x 25 rows in stockinette (note: much of this hat is knit in a variation on seed stitch, so keep that in mind when choosing a size if your gauge loosens up significantly in seed stitch) |
| NEEDLE SIZE | One set of needles for your preferred style of small-circumference knitting in a size to match gauge listed above, plus one set of needles three sizes smaller (for the brim). Suggested needle sizes: US 8 (5 mm), US 5 (3.75 mm) |
| TOOLS | One stitch marker for beginning of round; optional additional markers between pattern repeats Tapestry needle for weaving in ends |
| SKILL LEVEL | Intermediate Requires decreases, slipping stitches, and knitting in the round |
Abbreviations
| k = knit | p = purl |
| ssk = slip slip knit. slip two stitches knitwise and knit together through the back loop | k2tog = knit two stitches together |
| cluster 3 sts = insert right needle purlwise into the third stitch on the left needle. Slip that stitch over the first two stitches. K1, yo, k1. |
Pattern Instructions
Using your preferred cast-on method and your smaller needles, cast on 90 (100, 110, 120) stitches. Join for knitting in the round, being careful not to twist. Place a marker at the join to mark the end of the round.
Work 12 rounds of ribbing in the following pattern: *p1, ktbl; repeat from * to end of round. If you need help working the ktbl stitch, this blog post should be useful.
Switch to larger needles. Begin working the hat pattern as follows, or see Chart A below:
Round 1: *P2, cluster 3 sts, p3, (k1, p1) x 5 (6, 7, 8); repeat from * to end of round.
Round 2: *P2, k3, p2, k11 (13, 15, 17); repeat from * to end of round.
Round 3: *P2, k3, p2, k1, (p1, k1) x 5 (6, 7, 8); repeat from * to end of round.
Round 4: Repeat round 2.
Repeat this section 7 (7, 8, 9) more times for a total of 8 (8, 9, 10) repeats. If you like your hats deeper, feel free to work additional repeats, but keep in mind that doing so will require more yarn. After completing these repeats, work the following:
For Size S, work Rounds 1 and 2 one more time.
For Size M, work no additional rounds.
For Size L, work Rounds 1 and 2 one more time.
For Size XL, work no additional rounds.
Crown
Now you will begin closing the crown of your hat. At some point, you may need to change to double-pointed needles, depending on the small-circumference knitting technique you prefer. Make that change at any point during the following instructions when your stitches begin to feel too stretched on your circular needles.
For a charted version of this section, skip to Chart B below.
Each size starts on a different round. Size XL starts on Round 1, Size L on Round 3, Size M on Round 5, and Size S on Round 7.
Round 1: *P2, cluster 3 sts, p3, (k1, p1) x 3, sl1, k2tog, psso, (p1, k1) x 3, p1; repeat from * to end of round.
Round 2: *P2, k3, p2, k15; repeat from * to end of round.
Round 3: *P2, k3, p2, (k1, p1) x 3, sl1, k2tog, psso, (p1, k1) x 3; repeat from * to end of round.
Round 4: *P2, k3, p2, k13; repeat from * to end of round.
Round 5: *P2, cluster 3 sts, p3, (k1, p1) x 2, sl1, k2tog, psso, (p1, k1) x 2, p1; repeat from * to end of round.
Round 6: *P2, k3, p2, k11; repeat from * to end of round.
Round 7: *P2, k3, p2, (k1, p1) x 2, sl1, k2tog, psso, (p1, k1) x 2; repeat from * to end of round.
Round 8: *P2, k3, p2, k9; repeat from * to end of round.
Round 9: *P2, cluster 3 sts, p3, k1, p1, sl1, k2tog, psso, p1, k1, p1; repeat from * to end of round.
Round 10: *P2, k3, p2, k7; repeat from * to end of round.
Round 11: *P2, k3, p2, k1, p1, sl1, k2tog, psso, p1, k1; repeat from * to end of round.
Round 12: *P2, k3, p2, k5; repeat from * to end of round.
Round 13: *P2, cluster 3 sts, p3, sl1, k2tog, psso, p1; repeat from * to end of round.
Round 14: *(P2, k3) x 2; repeat from * to end of round.
Round 15: *P2, k3, p2, sl1, k2tog, psso; repeat from * to end of round.
Round 16: *P2, k3, p2, k1; repeat from * to end of round.
Round 17: *Ssk, cluster 3 sts, k2tog, k1; repeat from * to end of round.
Round 18: *P1, k3, p1, k1; repeat from * to end of round.
Round 19: *Ssk, k1, k2tog, k1; repeat from * to end of round.
Round 20: Knit to end of round.
Round 21: *Sl1, k2tog, psso, k1; repeat from * to end of round.
Round 22: *K2tog; repeat from * to end of round.
Break yarn, weave through remaining stitches, and close.
Weave in all ends, block, and wear. Enjoy your new hat!
Chart A
For size S, work the repeat section five times. For size M, work it six times. For size L, work it seven times. For size XL, work it eight times. Then start back at stitch one, and repeat the whole series until you reach the end of the round.
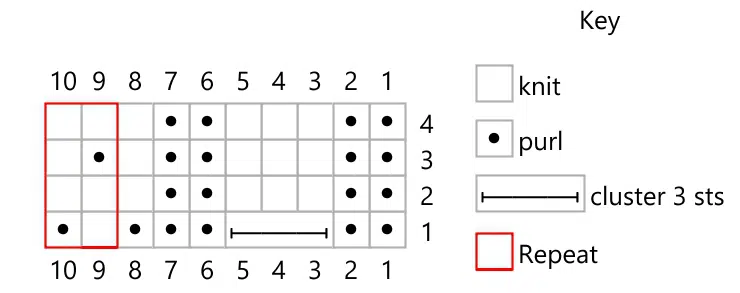
Chart B
Each size starts on a different round. Size XL starts on Round 1, Size L on Round 3, Size M on Round 5, and Size S on Round 7.

I hope you’ve enjoyed this free beanie knitting pattern! If you have any questions, feel free to drop a comment or send me an email.
Let’s stay connected!
Join my newsletter for 30% off all new releases, regular updates with helpful tips and tricks, first crack at registration for upcoming workshops, exclusive discounts, and more.
Join the A Bee In The Bonnet Facebook Group to participate in knitalongs and other fun community events
Come hang out with me on the A Bee In The Bonnet TikTok
Follow along on the A Bee In The Bonnet Instagram
Get inspired via the A Bee In The Bonnet Pinterest


It’s a lovely pattern. But I was even more surprised when I read your post and saw my name as your tech editor! Just knew I needed to get the pattern.
Can you believe how long we’ve been working together now? It’s so fun looking back at all the projects we’ve done together.