Knitting frequently relies on the use of simple techniques that can dramatically transform a project. In today’s post, we’ll be covering one of those techniques: slipping stitches. Understanding the different methods for how to slip a stitch will help you add polish and function to your finished objects.

In this post, we’re going to explore four elements involved in how to slip a stitch: slipping purlwise, knitwise, with yarn held in front, and with yarn held in back. Each method creates a slightly different finished stitch, and each method is used in different ways. Once you understand how they work, you can combine some of them for dramatic texture in your projects.
From creating neat, clean edges to intricate patterns, slipping stitches is a skill that, once learned, you’ll find indispensable. Whether you’re a beginner looking to expand your skills or a seasoned knitter seeking to refine your techniques, this guide will help you understand and apply these methods with ease and confidence.
Slipping Stitches Purlwise
Slipping stitches purlwise is the most common way to slip a stitch in the knitting world. Unless a pattern indicates otherwise, when it tells you to slip a stitch, usually you should slip that stitch purlwise.

To slip a stitch purlwise, insert your working needle into your stitch as if to work a purl stitch. Instead of purling, though, you’ll simply move that stitch from your non-working needle to your working needle. For most knitters, this will mean moving your stitch from your left needle to your right needle.
This is the default purl slipping method because it preserves the orientation of the stitch on the needles. If you knit with the right leg of the stitch forward and the left leg toward the back, then slipping purlwise will retain that stitch orientation. Likewise, if you knit with the left leg of the stitch forward and the right leg toward the back (this is common in some knitting techniques, especially combination knitting), then your stitch will stay that way when you move it from one needle to the next.
Slipping Stitches Knitwise
Slipping stitches knitwise is a different purl slipping method. Using this technique, you’ll insert your working needle as if to work a knit stitch. Instead of knitting, though, you’ll move the stitch from your non-working needle to your working needle. Again, for most knitters, this will mean moving your stitch from your left needle to your right needle.

Slipping your stitches knitwise changes the orientation of your stitch on the needle. This can lead to beautiful textures but can also lead to a stitch looking different from what you’d expect. In fact, the decrease I use in the Bricolage Socks was the result of my misunderstanding how to work a center double decrease and slipping the stitches knitwise instead of purlwise.
Take a look at the center swatch in the photo in this section. The two columns of decreases on the right show stitches slipped purlwise. The two columns of decreases on the left show stitches slipped knitwise. While it’s subtle, the different effects of the slipping techniques are visible, and the right set of decreases is more visually prominent.
Slipping Stitches with Yarn Held in Front
In addition to thinking about how to insert your needle when slipping a stitch, you also need to think about where you’re holding your working yarn. If you bring your working yarn to the front of your work before you you slip the stitch, it’ll create a line across the stitch that looks somewhat like a purl bump.
To slip a stitch with the yarn held in front, bring your working yarn forward to the side of your work that is facing you as if you were going to work a purl stitch. Let the working yarn drop down in front of the stitch you’re going to slip. Slip that stitch, and then return the yarn to the working position where you need it to be for the next stitch (in back of the work for a knit stitch or in front of the work for a purl stitch).
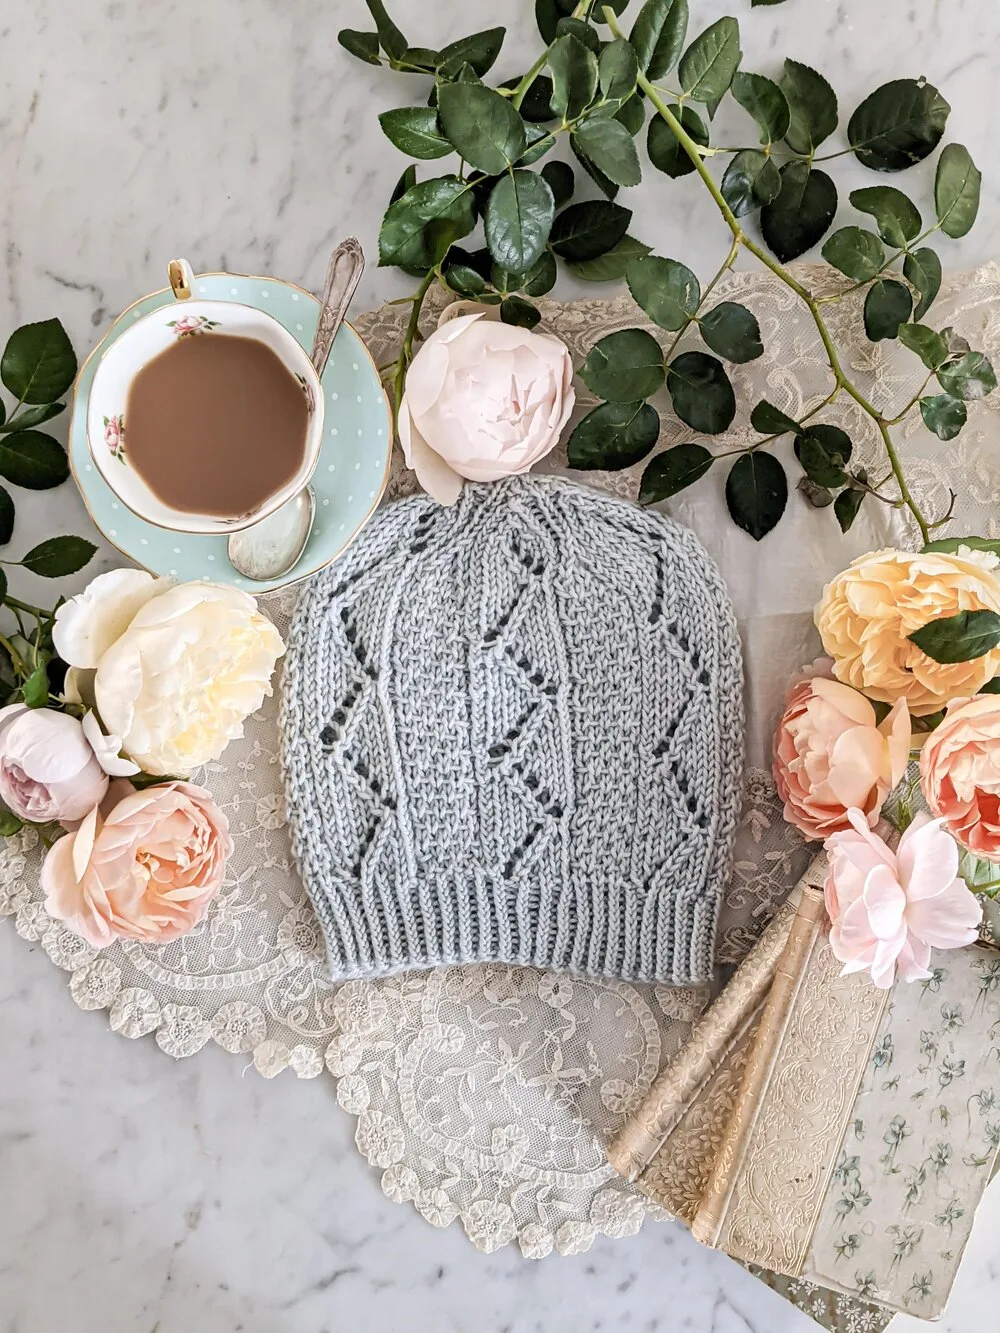
Take a look at the hat pictured in this section. The panels of texture that look like seed stitch are actually sections where I’ve slipped stitches with yarn held in front. The pattern is the Snuggery Hat. It’s a great way to get used to slipping stitches purlwise with yarn held in front.
Slipping Stitches with Yarn Held in Back
When you slip a stitch with yarn held in back, it allows the stitch to be a more visible stitch with no visual interruption from the working yarn. A slipped stitch is slightly taller than a regular knit stitch. That’s because it has to stretch across two rows of work. Visually, that results in a more prominent stitch.

If you take a look at the swatch included in this section, you’ll see that on the right side of the work, the slipped stitches are stacked on top of each other and look almost like a ribbed texture. These stitches are taller than the unslipped stitched next to them, which makes them more dramatic and visible.
On the wrong side of this swatch, the slipped stitches have the lines of yarn across them. It’s similar to the swatch you saw above with yarn held in front. Because the stitches are slipped with yarn held in back, though, it creates a different texture and visual effect.
Some Tips and Tricks to Know for Success with Slipped Stitches
Once you’ve grasped the different ways to slip stitches, you can use them in different ways and for different purposes. Here are some tips and tricks that can help you do that more effectively.
1. Slipping stitches affects your row gauge. When you slip a stitch, you are asking one stitch to take up the vertical space that would otherwise be occupied by two stitches. This elongated stitch usually can’t stretch across that entire space. As a result, you will need more rows to reach a specific measurement than you would need if you didn’t slip stitches.

2. Slipping the first stitch of a row can help create a tidy edge, but shouldn’t be your default. I’ve written a whole blog post about this. Suffice it to say that sometimes, when you slip the first stitch of every row, it can help create a nice, even edge. Other times, a slip stitch edge will mess up your dimensions and make it hard to seam your project. Slipping your edge stitches isn’t a cure-all for knitting problems. Choose wisely.
3. Slipped stitches can be used to create a beautiful decorative element. There are techniques in knitting, such as mosaic patterns, that use slipped stitches to create visual patterns that look like stranded colorwork but are much easier. This design feature is a great way to dip your toe into colorful, ornate knitting projects. Slip-stitch designs can also be created using texture rather than color. You can see that on my sock heels and in some other patterns.
4. Slipped stitches are a great way to reinforce your sock heel flap. If you look at most of my sock heels, you’ll see that I use either stacked slipped stitches or an eye of partridge texture. This adds extra cushioning to the heel and reinforces it against wear and tear.
5. Pay special attention to which side of your work is the front of your work and which side is the back of your work. This will have a direct relationship to how your slipped stitches look and what slipped stitch patterns you can create.
6. Garter stitch changes the game. All of the swatches here have used stockinette stitch. When you slip your knit stitches in garter stitch, those knit stitches will become tiny pockets of stockinette in the middle of a garter sea. It’s visually very striking, but you need to be prepared for it.
Once you understand the principles of slipped stitches, entire knitting worlds open up to you. When you slip stitches, you can make all sorts of modifications to your work, combine them to make new stitches, and fill your knitting with unique, personalized details that underscore your craftsmanship and skill.
Let’s stay connected!
Join my newsletter for 30% off all new releases, regular updates with helpful tips and tricks, first crack at registration for upcoming workshops, exclusive discounts, and more.
Join the A Bee In The Bonnet Facebook Group to participate in knitalongs and other fun community events
Come hang out with me on the A Bee In The Bonnet TikTok
Follow along on the A Bee In The Bonnet Instagram
Get inspired via the A Bee In The Bonnet Pinterest


So educational! Such a simple stitch but makes such a huge difference. Thank you for the great tutorial!