
I learned about yarn substitution the hard way. When I first started knitting, I bought a Debbie Bliss magazine that had this adorable, lightweight top for summer. It had a lacy yoke, short sleeves, and a bit of swing at the hem. The pattern called for an expensive, fingering-weight, linen yarn. I couldn’t find it and couldn’t afford it on my student budget, anyway, so I decided to substitute.
With Lion Brand Cotton-Ease.
Now, Cotton-Ease was a perfectly good yarn (it’s since been discontinued, alas). It was a cotton-acrylic blend that was great for items that will get heavy use. What’s more, the acrylic content made it much lighter and softer than many other 100% cotton yarns. I’ve used it on a lot of projects since then.
Goodness, though, was it ever the wrong choice for this one. The sweater turned out too big and too heavy, so it drooped until it hung from my shoulders like a circular tablecloth with a hole in the middle. That wasn’t the silhouette I was aiming for.
See, what I didn’t understand at the time was the fine art of yarn substitution. You absolutely do not have to use the same yarn recommended by the designer for a pattern. In fact, I rarely do. What you do need is to know what you’re doing if you plan to change things up. To help you do that, I’ve written out this guide to things you should consider before choosing a new yarn for your project.
But first: what exactly is yarn substitution?
Yarn substitution is where you use a different yarn from the yarn recommended by the designer who wrote the pattern you’re following.
There are all sorts of reasons you might want to use a yarn that’s different from what the designer recommends. Maybe you’re trying to use up some of your stash. It could be you’ve got a set yarn budget and the designer used an expensive yarn that would blow your budget wide open. Perhaps you’ve got a fiber allergy and need to switch to a yarn that won’t irritate your skin. Maybe you have moral or ethical concerns about the recommended yarn company, or maybe you just don’t like the recommended yarn, or maybe you’ve got another yarn you really like that you’d rather use instead. It’s totally fine.
Before you go subbing in your new yarn, though, think about the following issues. Understanding them will make your yarn substitution process more successful.
Step One for Yarn Substitution Success: Compare Weight/Put Up/WPI
The most important thing when choosing a yarn substitute is to pick a new yarn that is approximately the same thickness, or weight, as the recommended yarn.
That’s because yarn weight is one of the key elements that affects the gauge of your knitting. If you substitute with a yarn that is drastically thicker or thinner than the recommended yarn, you won’t be able to achieve the right gauge. That, in turn, means you’ll have more trouble knitting a garment that will fit you right.
If you’re really comfortable with doing a lot of math, making adjustments on the fly, and pulling out your work if you decide you don’t like how it works, then feel free to experiment with a yarn of a different gauge. On the other hand, don’t feel bad if you just want an easy knit without too much thinking involved.
Getting a yarn that’s labeled with the same weight as the previous yarn is only part of the challenge, though. To really make sure you stand the best chance of getting the right gauge, you need to check your new yarn’s put up and/or WPI. Put up refers to what sort of shape/size bundle the yarn is in. WPI stands for wraps per inch. If you compare those to the recommended yarn’s details, you’ll have a better sense of whether the substitution will work. I’ll explain what these things are, first, and then talk about why they’re so important.
What Is Put Up, Anyway?
Put up is the way your yarn has been bundled up. Yarn tends to come in hanks, balls, skeins, cakes, and cones. Each of those packages generally indicates two key details: how many yards or meters are in the unit of yarn, and how much that unit of yarn weighs.
If you divide the length of the yarn by the weight, you get a ratio. That ratio helps you understand how thick the yarn is. Then you compare that to the ratio of another yarn with a similar fiber content. If the ratios are close, you’re more likely to have a good match for substitution.
But not always. You also need to consider WPI.
WPI Explained In More Detail
WPI is a way to measure the thickness of yarn. It’s more precise than the yarn’s weight category of fingering, DK, bulky, etc. Each of those weight categories had a range of thicknesses within it, so if you’re going to substitute yarn, you want to find a yarn sub that’s as close as possible to the original yarn’s thickness.
To measure WPI, take out a ruler and an item of uniform thickness that you can wrap your yarn around. I like to use a pencil. Wrap your yarn firmly, but not tightly, around the item for at least a few inches, and then set it down next to the ruler. Using the ruler, measure how many times the yarn wraps around the item in the span of one inch.
Voila! You’ve just figured out your yarn’s WPI.
Why WPI Matters In Yarn Substitution
It’s important to know WPI because there is room for variation within each of the yarn weight categories.
For example, a yarn labeled 2/fine (often known as fingering or sock weight) can have a WPI of anywhere from 12-18. Multiply that over the many inches of a knitted item, and well, you can see how subbing in a yarn with a WPI of 12 for a yarn with a WPI of 18 could be a bit of an issue.
That’s especially true if you’re knitting a small, close-fitting garment like a sock or mitt. Try to get your WPI to match as closely as possible to avoid that problem.
You can read more about the ranges of WPI for each yarn weight on the Craft Yarn Council’s website.
Step Two: Compare Fiber Content
Different fibers behave in different ways. Designers choose yarns, in part, based on the fiber content. That’s because they know fiber content will affect the appearance of the garment.
A 100% wool sweater will look different from a sweater made from linen or bamboo fiber. They will drape differently, hold shape differently, feel different in the hand, and interact differently with the light.
Generally speaking, plant-based materials will be heavier than animal fibers. Natural fibers will be easier to block than acrylics (which can be “killed” with steam, but otherwise just are what they are). When you’re choosing a substitute yarn, try to get one with a similar fiber content. That way, your end result will have the same fabric characteristics.
Here’s an example of what I mean: in February 2020, I released the Profiterole Hat. It’s knit using one strand of fingering-weight wool yarn and one strand of lace-weight silk-mohair yarn. That little strand of silk-mohair yarn is important, because the mohair fibers catch on each other and lend stability to the fabric. That meant the hat could be knit at a much looser gauge than I would normally use for a fingering + lace combo. It resulted in a hat that was light as a cloud but still structurally sound and very warm. Most people who’ve knit the hat have substituted yarns, but if they didn’t use one with a halo like the silk-mohair, they sometimes found that the resulting fabric was too loose.
This can get a bit tricky if you’re substituting because you have a fiber allergy. If your allergy is very specific (e.g., you can’t do mohair, but you can do suri alpaca, or you can’t handle linen but you’re fine with cotton or bamboo), it’ll be easier to substitute than if your allergy is more broad (e.g., you can’t do any animal fibers at all and have to use plant fibers, or vice versa). If you end up having to make a major substitution, remember that plant fibers tend to be heavier than animal fibers. They also tend to have less memory.
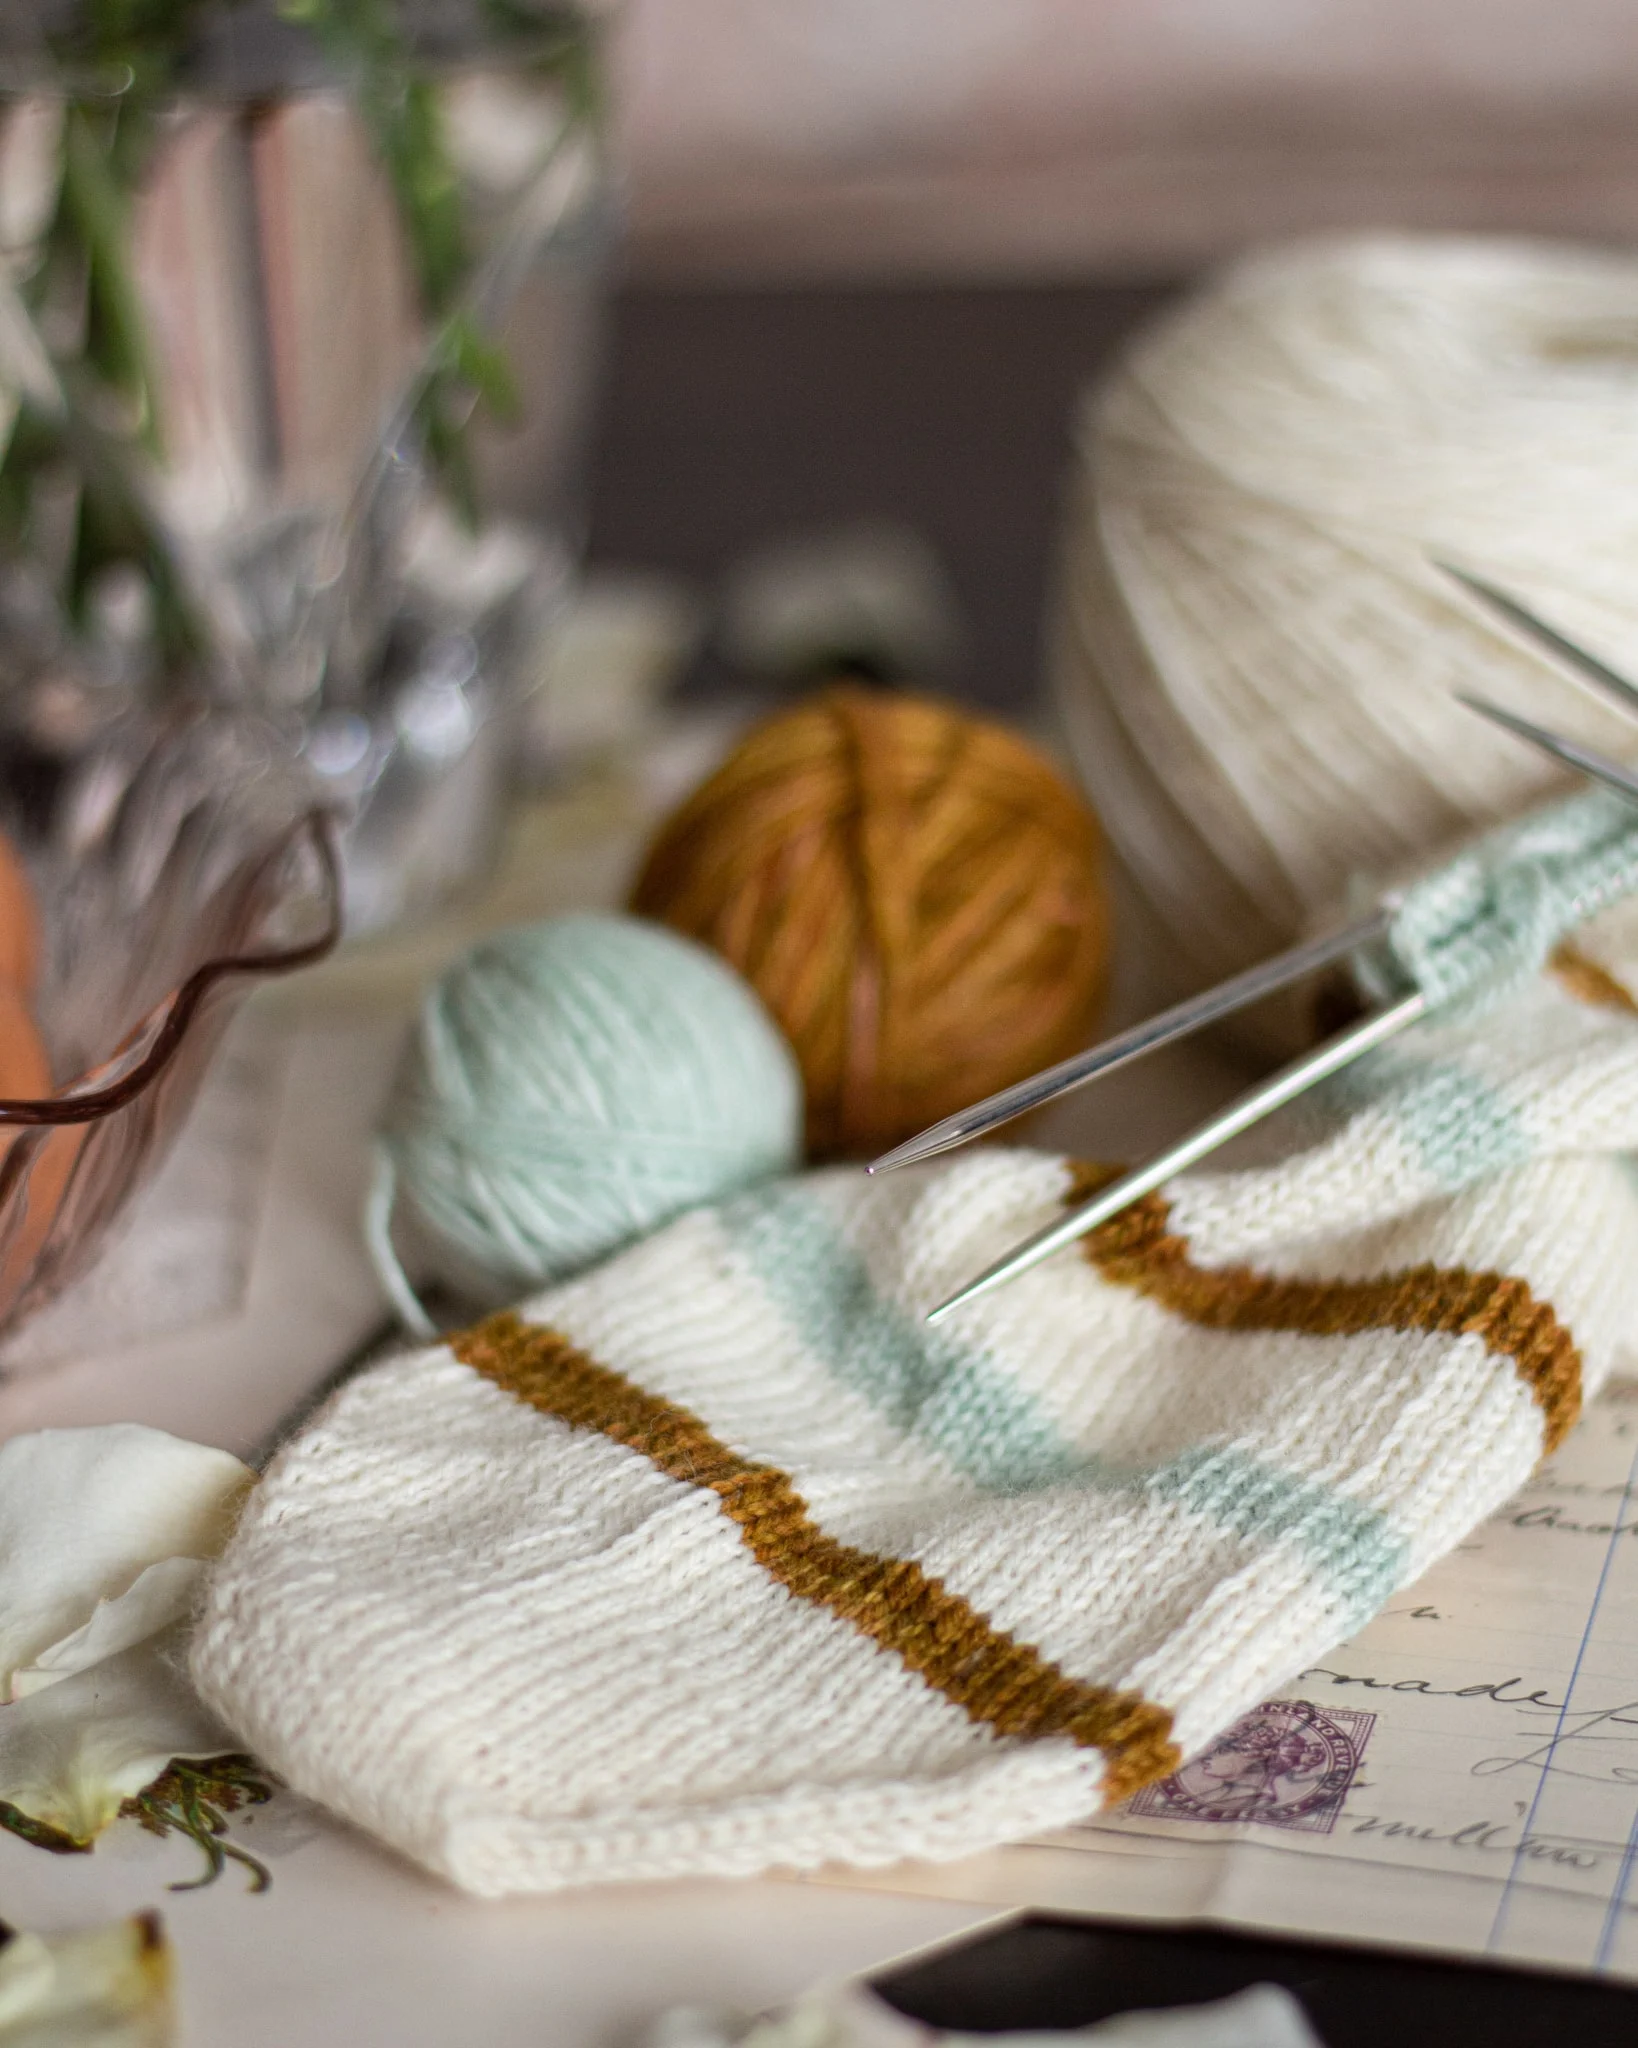
Step Three: Compare Yarn Construction

This is a more subtle detail, but depending on the type of project you’re making, it can be significant. When a yarn is spun from a pile of fibers into a string, it’s turned a little bit as it’s stretched out to make a tubular shape. That turning gives the yarn some stability. Sometimes, those individual strings are then twisted together to form a stronger, denser yarn.
Take a look at the picture in this section. You’ll see two different yarns, one pale pink and one a creamy color. Can you spot the other difference?
They’re the same weight, but they’re not made the same way. The yarn on the left has multiple strands of yarn plied together. The yarn on the right is a single ply of fiber. This construction difference is crucial when making a yarn substitution.
They’ve both got their benefits and drawbacks, which I’ll cover next.
Characteristics of Multi-Ply Yarn
Yarns with multiple strands of fiber plied together are very sturdy. That makes them a great choice for items that are going to get a lot of wear, like socks and sweaters. They also tend to have better stitch definition than single-ply yarns do. That means they’re good for colorwork and lace projects where you really want your stitches to pop.
Characteristics of Single-Ply Yarn
Single-ply yarns are, to put it mildly, gloriously soft. Have you ever pet a puppy in that super soft spot at the base of its ears? Yeah, we’re talking that level of soft. They’re great for items that won’t get a ton of friction while you’re wearing them and that you wear against sensitive skin—things like hats and cowls. The problem is that they’re not as durable as multi-ply yarn. As a result, generally they will pill more easily and develop holes sooner.
Worsted Spun vs. Woolen Spun

You’ll also want to identify whether the suggested yarn in the pattern is woolen spun or worsted spun. Worsted spun is smooth, while woolen spun is a little more rustic.
Look at the picture that accompanies this section. There are two yarns, one brown and one light green. They are the same weight and have the same number of plies. The one on the left is woolen spun, and the one on the right is worsted spun. If you want to dive deep into all the technical information about the differences between woolen spun and worsted spun yarn, you can read about it here on the MDK blog.
For many projects, it won’t make much of a difference if you’re switching yarn construction. If you’re making socks or colorwork, though, or working on a project that requires clear stitch definition, you should pay extra attention to how your yarn is spun.
Step Four: Compare Your Gauge
And now for the tricky, but crucial, part of yarn substitution: making sure you hit gauge. Prepare to fiddle with needle sizes and maybe make a math adjustment or two if your chosen yarn doesn’t quite match the gauge in the pattern.
To check your gauge, cast on 5-10 stitches more than what the pattern says will give you 4”. Knit using the same needles and in the same style that you’ll be knitting the garment (i.e., flat or in the round). Be sure to use the stitch indicated in the pattern when it tells you how gauge was measured. Work your swatch until the swatch is about 4” long, and then bind off. Block it the same way you plan to block the finished knit item, and set it somewhere safe to dry. Once it’s dry, use a measuring tape to determine how many stitches and rows you have in a 4” square area.
If your gauge is too loose (that is, fewer stitches per inch than it should have), try going down a needle size. If it’s too tight (that is, more stitches per inch than it should have), try going up a needle size. Then repeat the gauge swatching process.
Ideally, you want to get accurate stitch and row gauge. If you can only achieve one, though, choose accurate stitch gauge. It’s easier to just add more rows than to recalculate the width of a garment.
Step Five: Compare Instagram or Ravelry Projects
Sometimes, even after all that, you still might not be sure whether the yarn you want to substitute will work for your project. In case that happens, check out other people’s projects.
If you can use Ravelry, the project pages are very helpful. If you can’t, try searching the design’s hashtag on Instagram. You might be able to get a good sense for what the project would look like in your chosen yarn or get inspiration for another yarn to use.
Let’s use the Profiterole Hat for an example again. On Instagram, just type #ProfiteroleHat into the search bar, and check out the other versions people have posted. On Ravelry, you can go to the (Ravelry link) Projects tab on the pattern page to see other versions of the hat knit by other people. You can also go to the (Ravelry link) yarn ideas tab to see what yarns other people have substituted. It’s a great way to see how things might turn out before you start working on your own projects.
Step Six for Successful Yarn Substitution: Check With the Designer (Sometimes)
As a last resort, if the designer has published their contact information, consider reaching out to them if you have questions about yarn substitution.
Be respectful. This is extra work you’re asking them to undertake, and knitting patterns are already underpriced. Try to keep your question targeted and easy to answer. A good question might be, “Do you think a fingering-weight 80-20 blend of wool and nylon in a three-ply construction would be a good substitute for the recommended yarn?” A bad question would be something like, “What yarn can I substitute for this pattern?”
Be sure not to violate boundaries, too. For example, if they just list an email address for pattern inquiries, don’t message them on every social media platform where you can find them, too. Understand that some designers are buried in messages. They may not be able to get to yours quickly, or even at all.
As for me, well, I love hearing from people who are working on my patterns and do my best to respond to messages quickly. The best ways to get in touch with me are by messaging me on Ravelry or by sending an email to abeeinthebonnet (at) gmail (dot) com. Drop me a line any time.
Let’s stay connected!
Join my newsletter for 30% off all new releases, regular updates with helpful tips and tricks, first crack at registration for upcoming workshops, exclusive discounts, and more.
Join the A Bee In The Bonnet Facebook Group to participate in knitalongs and other fun community events
Come hang out with me on the A Bee In The Bonnet TikTok
Follow along on the A Bee In The Bonnet Instagram
Get inspired via the A Bee In The Bonnet Pinterest


This is fantastic THANK YOU!
I’m so glad you found it helpful, friend! ❤️
I have been knitting for awhile and have yet to use the yarn recommended by a designer for various reasons. My substitutions have been just based intuition and have often resulted in less than desired results. I am going to print this and use it, because this made me feel empowered by actual knowledge – my yarn purchases may take a bit longer as I review all of the yarns characteristics, but I have a much better sense of what I am doing! Thank you!!!!
That’s how I learned to do yarn substitutions, too, and it was a hard and frustrating process. I hope this will help you skip some of the hiccups!
This was a grat posting. It will stay in my notebook in my knitting bag. Thanks for sharing.
Thank you! I’m glad to hear you found it useful.
You’ve got the woolen spun vs worsted spun reversed. Worsted is smooth (using combed fibers), while woolen is more rustic. (using carded fibers).
Ah, you’re right, thank you! I was moving too quickly on that one, clearly. Appreciate the double check.
This was a great post. I have been looking for something to help determine how best to substitute yarn. I made a sweater that is just too heavy and was hoping to be able to make it in a lighter weight yarn. This will save me a lot of headache as well as trial and error.
I’m glad it was helpful to you! I hope you enjoy your next project.
There is a great site called yarnsub which compares most if not all of these elements and suggests alternatives.
Yarnsub is a great resource for substituting yarns from larger companies! But if the pattern calls for yarn from an indie dyer or one of the smaller manufacturers, it can be pretty hit or miss (I just checked for several of my favorites that I’ve used in designs this year, and nothing). Your best bet is always to know how to make the substitution yourself.